A compendium of everything you need to know that applies to all TWW3 campaigns.
I will remove this section once CA releases the upcoming update that is supposed to fix this bug.
At the beginning of a turn, the advisor will pop up a screen warning you that Ursun can be heard rumbling. This is your warning to prepare for the rifts to open within a few turns, maybe as many as 5ish?
A little rift icon pops up in the middle of the top bar when the Rifts appear, which a number below it. That icon tells you how many turns you have until the Rifts disappear from the map. Once they spawn, Rifts stay on the map for 15 turns unless closed by your armies or your heroes or by the AI.
Rifts opened at Turn 35, Turn 62, Turn 92, and 120ish for me; but this could be different every time.
One (1) Rift spawns per province, in the same spot each time (so you can prepare for them).
Rifts have different colors that represent a chaos god and warn you who you will fight if you close the rift with an army:
Khorne = Yellow
Nurgle = Green
Tzeentch = Blue
Slaanesh = Purple
IMPORTANT!
Rifts cause MASSIVE corruption associated with the chaos god represented by the color of the rift. Within like 3 maybe 4 turns max the corruption in your province will be 100% which will cause -300 growth. Therefore if you want a province to reach Tier 5 as soon as possible, it is essential that you close the rift in that province immediately upon it spawning.
If you leave the rifts open, eventually rogue armies of the chaos gods will spawn from the rifts and raid, sack, raze and spread corruption as they go. They can attack the closest settlement but they can also move on to attack other settlements especially if their first choice was destroyed.
Because of this, think carefully before you expand your empire too much or try to “paint the map”, because that will make it much more difficult to defend your empire. Expand too much and you will definitely need to rely on heroes to close rifts, and each hero closure costs 1500 gold.
1) Enter any of the 4 Realms of Chaos to go soul hunting (any colored rift allows you to go to any chaos god’s domain, you Don’t have enter a yellow rift to get to Khorne etc).
2) “Traverse Rifts” allows you to teleport your army to another rift anywhere on the map. You can do this with anyone, but great examples are Scrag the Slaughter or Legion of Chaos or N’Kari who are on the furthest west side of the map can teleport to Cathay on the most eastern side of the map and either blitz what you can and then teleport home, or capture territory to be your new home and start expanding your empire from there. A pretty genius way to allow factions that would never encounter each other to do so.
3) Teleport to the Forge of Souls once you collect all 4 souls to open the way.
4) Teleport to the Forge of Souls to intercept an enemy who beat you to collecting the 4 souls.
5) Close the rift, either with your army by fighting a battle against a chaos army, or with a hero by spending 1500 gold. NOTE that the Rift Armies start smaller and weaker but get more and higher tier units with each Ursun Roar, until you face full 20 stack armies that can include high tier units.
The main goal though is to use a rift to access a chaos god’s realm, and once there to complete that realm’s mechanics to unlock a Survival Battle. Win the Survival Battle to claim a daemon champion’s soul. See the Realms of Chaos section below for more info.
^ Credit to u/SteelbadgerMk2, you should read this really useful guide to each Realm of Chaos and their rewards. You will probably need this link in each of your campaigns in order to view the attached images that explain the jumps in the Realm of Tzeentch.
Here are my min/max essentials for each of chaos god’s realms:
u/SteelbadgerMk2 recommends doing Slaanesh first which is what I did (but there are also options which are tempting later in the game). Check out the list of rewards in his guide, some of them are juicy and fittingly tempting. For example in the 2nd Portal, one of the possible rewards is +200 Growth in all provinces for 15 turns. If you have already captured Prague and Hell Pit and maybe Castle Drakenhof, and if you made sure to immediately close their rifts so their growth was not reduced to 0, then they could quickly become Tier 5 settlements which would be extremely beneficial to your campaign. There is also a +15 levels for all Lords option, a 100,000 gold option, and a Slaanesh Blade option which is like giving your lord the Sword of Khaine from game 2.
You should be able to enter a portal in Forced March stance, so that is an option. You want to beeline through Slaanesh’s realm until you get to the Survival Battle or give in to temptation and take a reward.
I resisted temptation and got the soul on my first run.
NOTE – if one of your rival AI factions is well ahead of you in Slaanesh’s realm and probably going to beat you to the soul, then taking a reward that run is probably a good idea.
https://www.reddit.com/r/totalwar/comments/suz5nw/ca_really_outdid_themselves_with_the_rewards/
^ there are some possibly helpful comments about how to save scum to get different rewards, and one commentator thinks that the rewards are weighted so if your army has better units it is more likely to get better rewards.
Make sure to put your army into Encamp Stance before you click on the rift to enter Nurgle’s Realm, because you take attrition immediately upon entering and you cannot move or change your stance once you enter Nurgle’s Realm for the rest of that turn.
The white circles in Nurgle’s realm just replenish your forces, so unless you need that, you can beeline for the Great Tree that gives you the immunity you need to fight Nurgle’s Survival Battle. I wasted a few turns seeing what the white circle did at the start which slowed me down. You just need to kill the 2-3 armies directly in your way to the tree, and then go to the battle. The Nurgle armies respawn but they don’t really move unless you end your turn right near them, then they will attack you. You can move in Force March stance if it will help you get somewhere important faster and if you can deal with the attrition. A pretty easy realm.
If playing as Tsarina Katarin, this realm is why you want to max out “Reassuring Presence” for the -30% to attrition.
You are going to need u/SteelbadgerMk2’s Reddit guide for this one.
I spawned at Citadel of the Iron Knight, and so I went through the portal on the right and did the 5 jumps just as u/SteelbadgerMk2 showed in his linked picture, so my experience wasn’t bad. Apparently Liar’s Monolith sucks due to completel randomness so there is a good chance that you will want to save scum before entering Tzeentch’s realm.
There are white circles that you can interact with. These reveal sigils above portals so you know which teleporters match (this is probably how CA intended you to figure it out without a guide).
The white circles can also be used to either replenish casualties or obtain a boon. For example, you can get +90% factionwide research for nine turns as a boon.
Enemy armies you defeat have a post-battle option that lets you reveal sigils.
In the Realm of Tzeentch, if you move onto one of the bright blue (white?) circles, it ends all movement. I think movement ends when you complete a jump as well. It is better to look at the guide to getting through Tzeentch’s realm and follow that route than to look for sigils in the circles. Getting sigils from killing enemy armies is fine though.
You have to fill up a meter to unlock the survival battle. The meter is filled by “spilling blood”, which is really based on the hitpoints of damage you inflict in a battle. u/SteelbadgerMk2 wrote that the number of hitpoints needed increasing which each Ursun roar, from 300k up to 600k. I did Khorne last and I found that it was still really easy, I think I filled my meter with just 2-3 battles.
I could have completed Khorne’s realm super fast, if I hadn’t gone around collecting Khorne’s weapons. You collect them by going to the white circle at each corner of the map. Make sure you un-equip the previous Khorne weapon from your Legendary Lord or entering the white circle does nothing! Not sure if this is a bug or not.
Note 1: If playing as the Daemon Prince (Daemons of Chaos/Legion of Chaos), he can only use gear pieces granted by Daemonic Glory. As such, only your generic lords and heroes can equip these weapons.
Note 2: Khorne will take away the weapons that he has granted if you enter a different chaos god’s realm after you complete his. This is why I did Khorne’s realm last, but then I beat the campaign right after, so it was kind of a waste of time getting them, although the weapons may have helped Katarin and the heroes with her to wreck Be’lakor faster, so they may have been beneficial.
———————————–
Note that I have confirmed that if you leave a Realm of Chaos, it cancels the quest for the Survival Battle. Presumably you would have to start all over or possibly have to wait for the next Ursan Roar?
Your Legendary Lord is probably going to get negative traits from being in a Realm of Chaos. You can get this trait removed by camping your Lord in a Province Capital or if you only have a Minor Settlement available, by having a “torch” building in the settlement, example being a Patrol House (basically the building that lets you discover Skaven under-cities). This may take a few turns until your lord is back in a pure condition.
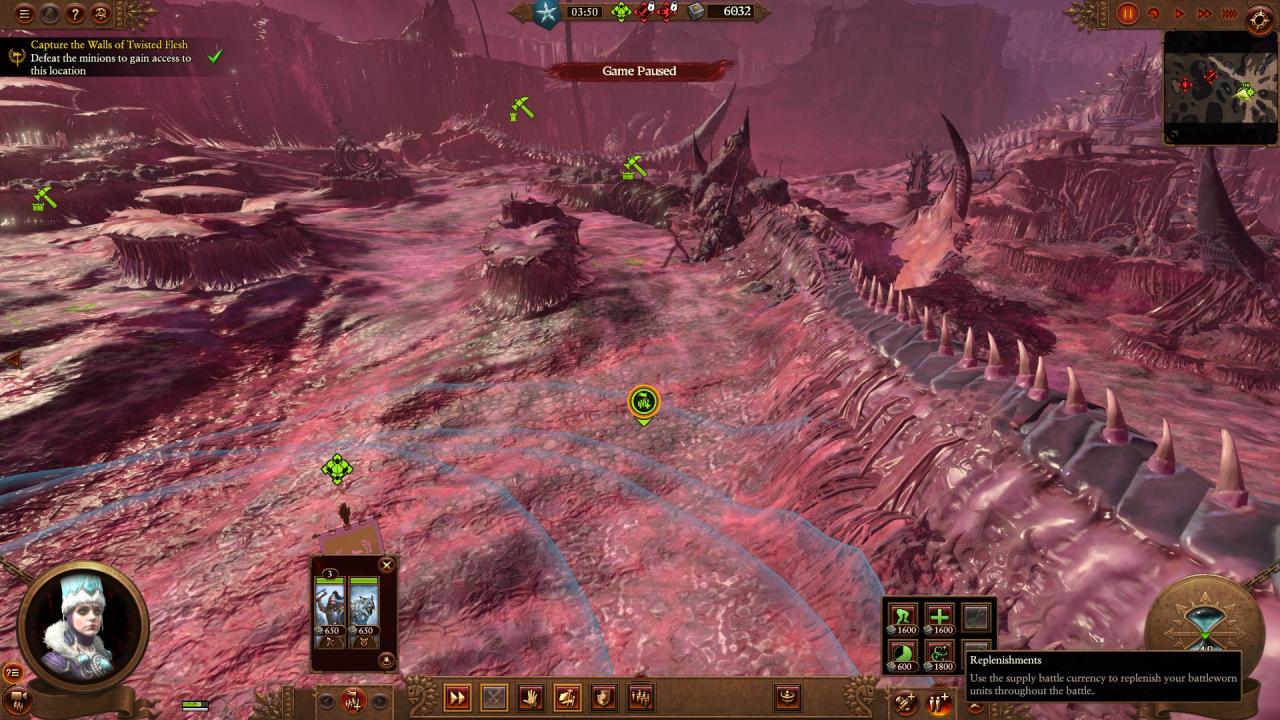
In the image above, do you see that little green icon in the middle of the picture? When you capture the first point, that little icon pops up and if you click on it, you will see the little box that you can see at the bottom left above where the unit cards should display (I hid the unit cards to make it stand out better), and this box will show your reinforcements. I think there is also a little button to the left that does the same thing as the green icon hovering over the capture point. Click on the unit icons in that reinforcements box, and they will spawn. They cost supply but your supply keeps growing and growing during the battle so not much of a concern, you just have to balance whether you want more units immediately or do you want to build towers and barricades first.
Now look at the bottom right of the image, where there are two little buttons and you can see that text box that my mouse caused to pop-up.
The left little button has options that give selected units +armor, +weapon damage, etc.
>>>!!! The right little button has an option that restores dead soldiers to life in a unit and restores their health, option that replenishes ammunition, option that restores Winds of Magic, etc.!!!<<<
This all costs supply. There is a supply cost for each unit, you can select multiple units and as long as you have enough supply the option you select will apply to all selected units.
There is also a button to teleport units back to the Reinforcement Box.
I wanted to emphasize all of these features because I didn’t see those 2 small buttons on the bottom right until the Final Battle, the ammo replenishment would have come in really useful earlier.
The Survival Battles follow the same plot. You attack the small force that defends the first capture point. Once taken, you get a big boost in supply, you gain access to Reinforcements (you get 3 Armoured Kossars and a Snow Leopard at the first point, you get a bunch of Ice Guard and Gryphon Legion at the 2nd Point, and you get Elemental Bears and War Bear Riders at the 3rd Point), and you can use supply to build towers and barricades. You get 30 seconds to build Towers and Barricades and call in Reinforcements, and then a wave of enemies comes in trying to overwhelm your position. Once you kill enough of them, the barrier preventing you from moving to the next point will disappear and you repeat this process again, and 1 more time after that. Once you capture the 3rd Point, the Daemon Prince you need to get a soul from will spawn coming from the direction of the citadel (so if you have your army facing the way you came like the previous 2 waves taught, the Daemon Prince will attack you in the rear, so be warned). Kill the Daemon Prince and enough of the 3rd Wave and you win. Note that Towers that you build will keep attacking enemy that spawn at the beginning of the map and which will run all the way to you, so it can be a good idea to leave those towers up.
You can auto-resolve the Survival Battles except for the Final Battle against Be’Lakor.
You can speed up (and slow down again) actions/movement by pressing R. You can permanently speed up actions at the start of your campaign by going to top left of your screen, clicking the “CAMERA” icon, and clicking “Fastest” for everything. You won’t get to watch what happens as it happens, but you also won’t have to wait as long to get through the End Turn calculations either. Do this right at the start of your campaign.
NEVER SET THE BATTLE TIMER TO “UNLIMITED”!
There may still be nasty bugs in TWW3 which can cause you to not be able to kill the last of the enemy and therefore not be able to win the battle and force you to concede defeat. I saw this in Shogun 2 when the AI attacked my castle and I beat the attackers, but they had a reinforcing army, but that army would not enter the map, therefore I could not kill them to win. “60 Minute” timer maximum, if you cannot win in 60 minutes, you deserve to lose. NOTE – an exception to this is if you are attacking and have a lord powerful enough to solo the enemy army but will need more than 60 minutes to do so. Then “Unlimited” time is fine, just remember to change it back to 60 minutes before you have to defend.
20 MINUTE TIMER TRICK
Conversely, if you set the battle timer to 20 minutes and are defending, as long as you can keep 1 unit that survives and does not rout until the 20 minute timer is up, you can “win” by causing a Draw even against an enemy you should absolutely lose to if you try to fight.
NOTIFICATIONS
At the bottom right, if you uncheck all those boxes, you can turn off all those notifications, or just the ones you do not care to see. If you do this, at the same time, you can check a box on a Hero (and maybe a settlement?) that will cause you to receive a notification that you have not used that hero that turn, so important heroes & lords will still be addressed every turn but those that you plan to park somewhere for 50 turns will not bug you every turn.
RESEARCH
If you are not researching anything, winning battles can reward you with an Ancillary that gives +10% to Research Rate (this ancillary is called Student for Kislev and can only be assigned to Heroes). I also got one of these from a successful Steal Research action by a hero, so hero actions while no research is active may reward as well. So get in the habit of ceasing all research at the start of your turn, fighting all the battles and performing all the actions you need to do in your turn, hopefully gaining a bunch of +Research Ancillaries (do not forget to assign them to your Heroes), then Resuming research before you End Turn.
USING MAGIC PROPERLY!!!
If you hate magic and mages because you think that in order to use Burning Head or other “go straight in a line” spells, that you have to move your mage into the right position, ooh boy, you are going to love this tip. AS YOU CLICK THE ICON TO CAST THE SPELL, YOU CAN HOLD DOWN THE MOUSE AND ROTATE THE SPELL IN THE DIRECTION YOU WANT, THEN RELEASE AND THE SPELL WILL FIRE IN THAT DIRECTION.
Here you can give your Lord & Heroes all sorts of items like Weapons, Armor, Trinkets (like +20% Ward Save items), Magic Wands on Magic Casters; etc. These should be obvious, but the tips below are not as obvious, and what this guide is really here for. Pay Attention!
You can REPLACE A LORD!!! You can disband Lords and they will return to your recruitment pool (and stop costing you money by decreasing the Supply Lines penalty) and after 5 turns they will be available to recruit again. A lot of times this works on Immortal Generic Lords (although you probably need to disband the units in their army first before you can disband them), but sometimes disband does not work on these Immortal Generic Lords, and it often does not work on Legendary Lords. Workaround? You replace them with another, low level lord, then disband that lord. So you have a use for the crappy low level lords that you get via confederation or that you got at the beginning of your campaign but ended up disbanding for some reason early on and never ended up leveling them.
Perfect use for this is if you your Faction Leader is Max Level and you want to replace them with a different lord to level that lord up (and after 5 turns have your faction leader available to summon to a hotspot or have them lead a crusade at the other end of the map from where they were); or, if you had Katarin conquer everything to the west of Kislev and now you want her to lead an invasion of the East toward Cathay, but it would take 10-20 turns to get her over there leading that army, and if her army isn’t that great anyway, you could just replace her, then disband that whole army and have Katarin recruit another one closer to the action once she becomes available again. You could even have the army recruited and ready to go using another lord then have Katarin replace that lord.
MOUNTS
You can select/change/remove the Lord or Hero’s MOUNT if you have given them one. NOTE that you can change a mount once per turn, and you can do it instantly, so if you need to dismount a Lord from his horse so he can scale the walls in a siege, you can do that right before you attack. And you can you re-mount the Lord before a field battle. NOTE that mounts increase the upkeep cost of your Lords & Heroes; Lizardmen Skink Priests and Skink Chiefs on Ancient Stegadons are EXPENSIVE! If you do not need your Lords & Heroes on a mount, it is a good idea to remove them from their mount so that they cost you less in upkeep.
YOU CAN RENAME LORDS & HEROES
You can sort your Lords & Heroes a number of ways, but if you take the time to figure out a good naming system, you could sort by name, and be able to first do everything with your Lords, then your Assassin heroes, then your Steal Research heroes, then your Damage Walls heroes, etc. Note that there are 2 spaces for names, so you can put Ezio in the top line and “the Assassin” or “de Assassin” or “da Hitman” in the bottom line, and their name will show as “Ezio de Assassin”. You can also put their name in the top line, and put their key usage in the bottom line, such as “Damage Walls” or “Assault Garrison” so that hero is easier to find when you need that particular use. I highly recommend you come up with such a system and set it up as you recruit heroes and move along in your campaign, late game hero management can really make you hate ever having recruited heroes to begin with.
REPLENISHMENT
Lords, Heroes and Single Entity units (Giants, Doomwheels, Carnosaurs, etc) do not benefit from the Post-Battle option that immediately replenishes your forces, they only benefit from getting healed in battle by spells or items that regenerate their health before the battle ends (Life Magic spells are good example), or from the replenishment from being in your own province, settlement, or Encamp Stance (which can be further boosted by items and hero skills).
Above is very important to know if you want to do lots of fighting in enemy territory or in the ocean. Heroes and single Monsters can be awesome, but also awesome is the ability for an army of 19 units to instantly heal to full health and unit numbers after each battle as long as they do not take too much damage and choose the post-battle replenish option.
You could reload a previous save, but there is a potentially much better option. You can replace the Lord who was in March stance with another Lord. The new Lord will show as being in March stance, but the trick and tip is, you can now change the stance back to “Stance: None” so that when the enemy attacks you, you can retreat and hopefully far enough away that the enemy won’t be able to catch you.
https://www.reddit.com/r/totalwar/comments/fjb0fb/after_1000_hours_i_found_out_you_can_extent_the/
When you go into the diplomacy screen, the diplomacy list that shows the factions is quite short and forces you to scroll a lot.
At the top left of that list, there is a little icon that you can grab and extend the diplomacy list up so you can see more of the factions at once.
A simple quality of life improvement.
The settlement region you want to trade must neighbor a faction you want to trade with.
Examples of what you can do with this feature:
1) The Lahmian Sisterhood Vampire Count faction based out of The Silver Pinnacle to the east of Kislev across the mountains, razed Khazid Irkulaz and Karak Ungor. I thought about colonizing them and capturing The Silver Pinnacle to create another province for myself, but I would overextend my limited armies doing that. So instead I decided to gift them to the Dwarves so that they could be my buffer to the east. Zhufbar owned Karak Raziak so I could not sell or gift the settlement to Karak Kadrin so I had to offer them to Zhufbar, and I could not sell Karak Ungor to Zhufbar until I colonized Khazid Irkulaz. Once I sold Khazid Irkulaz to Zhufbar, then I was able to sell Karak Ungor to them as well.
Strategy Summarized: to my observation the AI seemed bad about colonizing ruins. Colonize ruins and immediately sell them to their former owner or to another friendly AI faction so your friends do not get overwhelmed by your enemies. Friends help Friends.
2) This was sweet. I captured Castle Drakenhoff but Stirland owned Waldenhof and Konigstein Tower so I could not enact the Provincial Commandment. However, at some point Waldenhof got razed, and I was going to Colonize it to keep it, and then decide whether it was worth it to go to war with Stirland for Konigstein Tower. Out of curiosity, I checked to see if Stirland would sell me Konigstein Tower for something reasonable. They me Konigstein Tower for free!!!
Summary: Always check your diplomatic options, and particularly do so after situation altering events, like a settlement in a province you and the AI share gets razed.
3) A tooltip I just read suggested another great idea, you can offer a settlement in order to get a peace treaty. So you could capture a minor settlement and then offer it back to a faction in order to obtain peace.
And for Magic Items, you can now Fuse magic items of the same type and same rarity. So if you have two Sceptre of Stability which are “Common” (Grey) rarity “Arcane Item”, you can click the checkbox next to each of them, and then click on “Fuse”. You will be rewarded with a random higher rarity item (so even if you used 2 common arcane items, you could get an Uncommon (Green) rarity Armour.
I love this new mechanic. If you have Followers or Banners that you consider useless, just sell them for some extra cash. And you can sell Magic Items for cash or Fuse them and see if you get a really great item, and you can sell the new item if it is also bad.
https://www.pcinvasion.com/total-war-warhammer-3-alliance-outpost-allegiance-guide/
^ links for anything I may have missed or not emphasized enough
From Hungrygeeks:
“War Co-Ordination Consumes Allegiance
Whenever you command an ally or Vassal using War Co-ordination, you immediately consume 10 Allegiance. Take note of this as you cannot undo and return spent Allegiance. Decide carefully whenever you call an ally to defend or attack a region.”
Once you get a Defensive Alliance with a faction, you may be able to build an outpost in one of their Provincial Capitols (key point, only if their other allies have not already built outposts in each of their Provincial Capitols. So if you really want Dwarf Ironbreakers, you better buddy up with a Dwarf faction fast and build the first outpost immediately, and then make sure that faction is not destroyed). Normally a Provincial Capitol is a Major Settlement, but with this new weird system where Kislev has Minor Settlements as their “Provincial Capitol”, I’ve seen allies build outposts in minor settlements that were also the provincial capitols. And your allies will probably build an outpost in your Provincial Capitols and quickly, so keep that in mind when considering who to ally with first (like if you’d like Dwarves to build outposts before Empire factions because the Dwarves have better base units).
You can only build the first tier outpost if you just have a Defensive Alliance. Once you have a Military Alliance, can you build the 2nd and then 3rd Tier Outpost.
The Tier 1 Outpost just lets you recruit locally, while the Tier 2 and Tier 3 Outposts let you recruit from your ally’s global recruitment pool and also lowering costs to do so). I think this is why you have the option of moving your outpost to another settlement, because the other settlement might have military buildings allowing you to build the units you really want (like Hellstorm Rocket Batteries). But if another faction already built there, then the only way you could access such units would be if you upgrade to a Military Alliance and build up to Tier 3 Outpost so you can access your ally’s global recruitment pool (and get those sweet, sweet Hellstorm Rocket Batteries).
Each of your armies can only have up-to 4 allied units in it. This limit applies even once the allied units are already recruited and you try to transfer them to a new army (but you may swap allied units between armies, just no going over the 4 unit limit).
You can only recruit 2 units per turn from each ally (but if you have two allies you can recruit 2 units from each ally on that same turn. If you had 4 allies, you could recruit 1 unit from each of them the same turn).
Just to emphasize, allied unit recruitment is separate from your own regular and global recruitment.
Always be on the look for Ally Missions (especially while in the Realms of Chaos, specifically Khorne and Nurgle’s realms). Completing them gives you a bunch of extra Allegiance with that ally.
Multiple Allies can request that you kill the same enemy.
Be Careful, once you accept an Ally Mission, I have not seen a way for you to cancel it, so if you agree to kill an enemy you cannot reasonably get to, you’ve blocked yourself from getting better, closer missions from that ally. Hungrygeeks mentioned that there is a time limit, but from what I’ve seen that time limit is to accept the mission, not to complete it.
Reddit u/GentleDementia responded:
“The replenishment cap is 50%, however multiple heroes with replenishment skill will not stack, it will only apply the bonus of the hero most recently added to your army. (i.e. if you add a level 10 patriarch with a maxed replenishment skill, and then add a level 1 patriarch, the level 1 bonus will overwrite the higher bonus)
It appears that a Patriarch provides a base +8% Replenishment upon embedding him in an army. “Replenish Troops” at Tier 3 adds +9%, for a total of 17% Replenishment.
If this is true, then the Lord skill “Logistician” which gives +6% Replenishment might actually be useful, and combined with a T3 RT Patriarch would provide +23% Replenishment. Researching the Tech “Convalescence” adds +2%, for a total of +25% Replenishment.
This presumably applies to the Frost Maiden’s “Scouting” skill as well. “Scouting” provides +10% Magic Find Chance upon embedding in the army. The skill adds +15% to that chance, for a total of +25% Magic Find Chance.
https://www.reddit.com/r/totalwar/comments/syr0uh/the_chaos_realms_tips_and_ai_cheats/
^ Excellent Reddit guide, essential links in it for navigating Tzeentch’s realm
https://hungrygeeks.com.ph/total-war-warhammer-3-outposts-allegiance-guide/
^ lots of interesting looking links to other TWW3 guides that may be helpful if I don’t get to them. Although I noticed they are wrong about Khorne’s weapons, they said you can only get one of them, but you can get all of them IF you un-equip the Khorne weapon your Lord already obtained.
https://www.pcinvasion.com/total-war-warhammer-3-realm-of-chaos-guide/
Therefore, if you put a full & powerful army in front of your bait lord and place it in Ambush Stance, the AI will walk into your trap.
Note that during Deployment phase in a Battle, you can grab the Reinforcement Marker and move it around the edge of the map, at the cost of increasing the time it takes your reinforcements to arrive. So if your reinforcements are going to come in from a terribly disadvantaged direction, you can move the marker around so that they come in behind your forces, as long as you can afford the delay.
With this understanding, I recommend that you play on Normal Battle difficulty. Battle gameplay is balanced around Normal Battle difficulty. Very Hard Battle difficulty gives the AI stupidly strong bonuses to melee stats and leadership but Ranged stats remain mostly the same, so you are incentivized to build all-ranged armies, or ranged armies with heroes & single-entity monsters to aggro and tank the enemy, or armies that are all heroes and/or all single-entity monsters.
This bonus to enemy melee is particularly devastating to your cavalry effectiveness. Cavalry charges should feel epic and devastating, but on Very Hard Battle Difficulty, your cavalry will feel like slapping the enemy with a wet noodle.
Normal Battle difficulty will allow you to utilize your entire roster and have a lot more fun, so I definitely recommend playing on Normal battle difficulty since there isn’t an achievement incentive to play Very Hard Battles.
A new feature of The Twisted & The Twilight update is the ability to abandon settlements you do not want. To do this, click on the Regions’ Main Settlement Building, and at the bottom of the pop-up there will be a button you click to abandon the settlement on the next turn, pretty much the same process you would do to demolish the other buildings in a region.
This feature is FANTASTIC for everyone and particularly Skaven, see my Skaven guides for more info.
You can sack a settlement for the money and occupy for army replenishment, and then abandon it when you no longer need it. However, you may want to use this tool judiciously because of the downside, read on.
—–
SUPER IMPORTANT!!!: As fantastic as this feature is, there are major consequences for abandoning settlements, especially many at the same time or in rapid succession. The consequences for abandoning are:
When you “Abandon Settlement”, every province you own takes a
Devastation PO penalty of -5 (next turn only) and an
Uncertainty penalty of -3 (reducing by 1 per turn)
for every settlement you abandon.
So 3 settlements abandoned in a single turn generates a -15 Devastation penalty (one turn) and a -9 Uncertainty penalty (-1 per turn) in all owned provinces apart from Forts, which are immune.
All of the above is with a campaign on Hard, other difficulties may or may not have different numbers.
—–
On the other hand, if you are prepared for this, you could consider the Uncertainty modifier an additional upside. See the change to Public Order section below, but basically they made the change to try and curb the practice of players causing rebellions in their own provinces in order to farm the rebellions for gold and experience. This may help cause more rebellions for you to farm, but be aware, the modifiers affect EVERY province you own, so rebellions could pop up everywhere at the same time.
https://www.reddit.com/r/totalwar/comments/7ufew8/a_guide_to_gun_formations_in_total_war_warhammer/
This is a tip I just discovered today, 03/15/2022. If you hover your mouse over the Rank Button that you press to go into your Lord’s skill tree screen (or that is at the top left of your Lord’s skill screen to the left of their portrait), it will break down how your skill points have been applied:
Character Skills (Yellow):
Battle Skills (Red):
Campaign Skills (Blue):
Huzzah! – this reference courtesy of Tsar Peter from the Hulu tv show “The Great” (which is an excellent show about Catherine the Great and Russia that I highly recommend you watch)
RAZOR STANDARD only applies to melee attacks. So putting it on ranged units is worthless.
BANNER OF ETERNAL FLAME’s +8% Weapon Damage only applies to Melee; however, the banner’s FIRE DAMAGE applies to BOTH Melee and Ranged, and the banner gives an aura that affect multiple units, so if you put the banner on Empire Crossbowmen you could turn them into brutally efficient purgers of the Undead.
Need to know what climate type a province/region has? Hover your mouse over a region until a black text pops up, that text box has in there what climate type that region has.
^ comments from this post
Per u/RAMPShade
Momentum gives +4% MA and -1% Vigour/sec per point captured. Defenders get a buff from the key point for MD and leadership. So with max momentum, units can go from exhausted to fresh in about 25 seconds of inactivity, which is… massive.
other comments:
u/ApplesauceMayonnaise
Did they change how capping works? I’ve taken the capture point and held it but I didn’t see a timer or anything and I ended up having to beat the whole AI army. In WH2 I remember you had to take back control and then hold it for a bit to even stop the timer.
u/LiquidInferno25
Yes, it’s different now. There aren’t raw points (at least none visible to the player), instead there’s this buff called momentum. The more caps you get, the higher the momentum. I don’t remember the exact numbers but for attackers they get a leadership buff and (I think) melee defense buff and for the defenders they get a debut of the same value. Check your units active buffs (next to their stat cards) during a settlement battle and you’ll see it.
u/SnowyMole
The complete answer is that for minor settlements, if you take all 5 points you win instantly.
For walled settlements, you can also win instantly if you take all the points, but there is an addition that if you take one of the “bigger” points (there are two and they have a different symbol than the others), you’ll start to get a victory bar accumulating, fill it up and you win. Taking both of the bigger points fills it up faster. You don’t get anything toward that victory bar for the minor points, but again, if you cap all of the points you win instantly regardless.
As someone else mentioned, each point you take also gives you momentum, and strips momentum from the defenders. Basically they get weaker and you get stronger. It also instantly destroys any constructed buildings connected to that point, and reduces the speed at which the defender gets supplies, so they won’t be able to build as much.
Bottom line is that mobility is at a premium, especially for attacking, and having even some crappy light cav or warhounds to run around and cap points is incredibly valuable. T1 Peasant Horsemen for Cathay were literally my MVPs for a while until I got better cav in there.
More Guides:
- Total War WARHAMMER III: Changing of Ways Guide (Tzeentch Campaign)
- Total War WARHAMMER III: Kislev Guide
- Total War WARHAMMER III: Khorne’s Guide
- Total War WARHAMMER III: Kairos Fateweaver Skill Tree Guide