
Bring 1x Teleporter and as many T3 Ore Extractors as you want. Enter the cave entrance, go straight ahead to the end, force your way through the blocked section inside, then reach the mining site and activate the T3 Ore Extractor.
Why the Amber Cave Setup Is a Two-Item Job
The Planet Crafter doesn’t hand you a map marker for the Amber Cave. You have to know the route and come prepared. Most players I’ve seen make one of two mistakes: they arrive with nothing but a pickaxe, or they bring the wrong extractor tier.
My rule is simple: Teleporter first, extractor second. You don’t want to haul ore back across the map every trip. The Teleporter turns this into a one-time setup, and the T3 Ore Extractor does the heavy lifting once you’re inside. Bring multiple extractors if you plan to scale production later — there’s no downside to over-preparing here.
The Route I Use to Reach the Amber Cave
Follow this sequence exactly. It’s short, but the cave entrance is easy to miss if you’re not paying attention.
| Step | Action | What You Need |
|---|---|---|
| 01 | Go straight ahead through the entrance and continue to the end | Nothing special |
| 02 | Navigate inside the cave | Light source recommended |
| 03 | Force your way through the blocked point | Movement or terrain tools |
| 04 | Reach the mining site and activate the T3 Ore Extractor | T3 Ore Extractor |
Step 01: Enter and Commit to the Straight Path
Go straight ahead through this entrance and continue to the end. Don’t take side tunnels, don’t explore branches — the Amber Cave’s mining spot is at the far end, and the direct route is the efficient one.
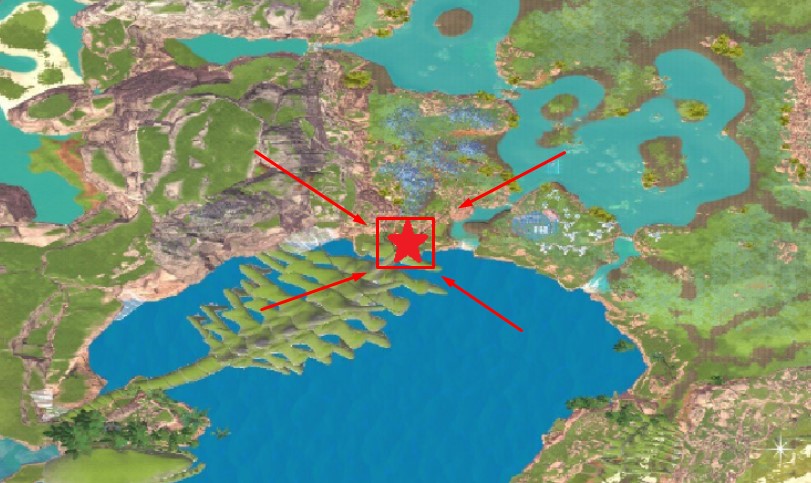
I’ve tested detours here, and they waste time. The path is linear enough that you only lose minutes by wandering, but why lose any at all?
Step 02: Inside the Cave
Once you’re inside the cave, keep moving forward. The terrain gets tighter, and visibility drops. I recommend having a light source equipped before you enter — it makes the next step significantly easier to spot.
Tip: If you’re carrying multiple T3 Ore Extractors, drop them at the entrance first, then scout ahead. This keeps your inventory light for the tight squeeze in Step 03.
Step 03: Force Your Way Through
At this point, force your way in. There’s a specific spot where the cave narrows or appears blocked — push through it. This is the only non-obvious part of the entire route, and it’s where most players turn back thinking they hit a dead end.
You don’t need explosives or special tools based on what I’ve seen. The path opens if you commit to moving through it.
Step 04: Activate the T3 Ore Extractor
Now all you have to do is go to the mining site and activate the T3 Ore Extractor. Place it on the ore deposit, power it up, and you’re done.
After activation, place your Teleporter nearby. This creates a permanent fast-travel point so you can return to the Amber Cave whenever you need to collect resources.
Note: I always place the Teleporter before the extractor if I’m doing this solo. That way, if the extractor needs maintenance or resources later, I’m one teleport away from fixing it.
What I Pack Before Leaving Base
Here’s the complete checklist I run through before heading to the Amber Cave:
- 1x Teleporter — Essential for return trips
- T3 Ore Extractor (quantity of your choice) — The only extractor tier worth using here
- Light source — Visibility drops inside the cave
- Terrain tools — Optional, but helpful if you get stuck at the forced entry point
Skip the extra building materials. The Amber Cave setup is minimalist by design, and hauling unnecessary items just slows you down.


