Since the store’s UI has been updated, some people have mentioned their struggles with understanding how it works. This guide intends to make understanding and using the store simple.
The ‘Store’ and ‘Layout’ sections provide a more detailed explanation with images, but if you are wanting a quick TL;DR, step by step guide on each action you can do in the store, feel free to skip ahead to the ‘Basic Usage Summaries’
Store
The shop has an intended ‘flow’ of usage that may not be immediately obvious at first glance, but is very simple once understood.
The main confusion arises from the fact that:
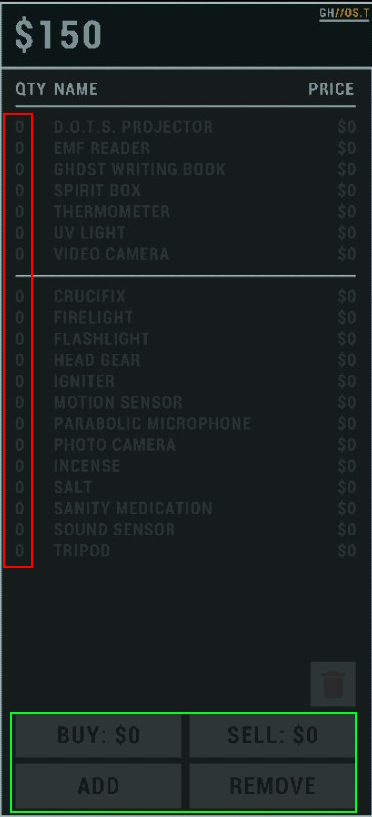
- the add/remove/buy/sell functions use the same list.
- the list does not reset once things are bought or added.
- Changes are only shown on the icons above the items.
- Using the +/- symbols, add/remove the amount of items you wish to buy/add to the truck, or sell/remove from the truck.
- Pressing ‘+’ will not buy/add anything, and pressing ‘-‘ will not sell/remove anything. You are only changing the quantity of items changed by what you are doing (add/remove/buy/sell).
- Press ‘add’ if you wish to move items from the storage into the truck, or ‘buy’ if you wish to purchase more items to have in your storage. The amount of items that will be added or bought are shown on the equipment list.
- The list WILL NOT change after buying or adding equipment.
- Sell and remove work the same way but in reverse.
- If you wish to add the items immediately after buying them, the list is preserved. If you don’t want to do that, you may use the trashcan symbol to reset the list.
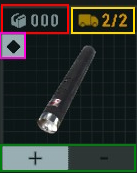 Red: the amount of that item that you have in storage.
Yellow: the amount of that item that is currently being taken into your next mission
Green: the add/remove item buttons. These changes will be displayed on the right, on the equipment list.
Pink: unsure as of making this guide. I believe it has to do with the tier system
Red: the amount of items selected.
Green: the control buttons.
Add: add will move x amount of each item from the storage into the truck as specified by the quantities selected (red).
Buy: buy will buy x amount of each item and put it into the storage as specified by the quantities selected (red).
Remove: remove will move x amount of each item from the truck into the storage as specified by the quantities selected (red).
Sell: sell will sell x amount of each item from the storage as specified by the quantities selected (red).
As stated above, these actions do not change the list. The changes are shown above the items themselves.
Layouts
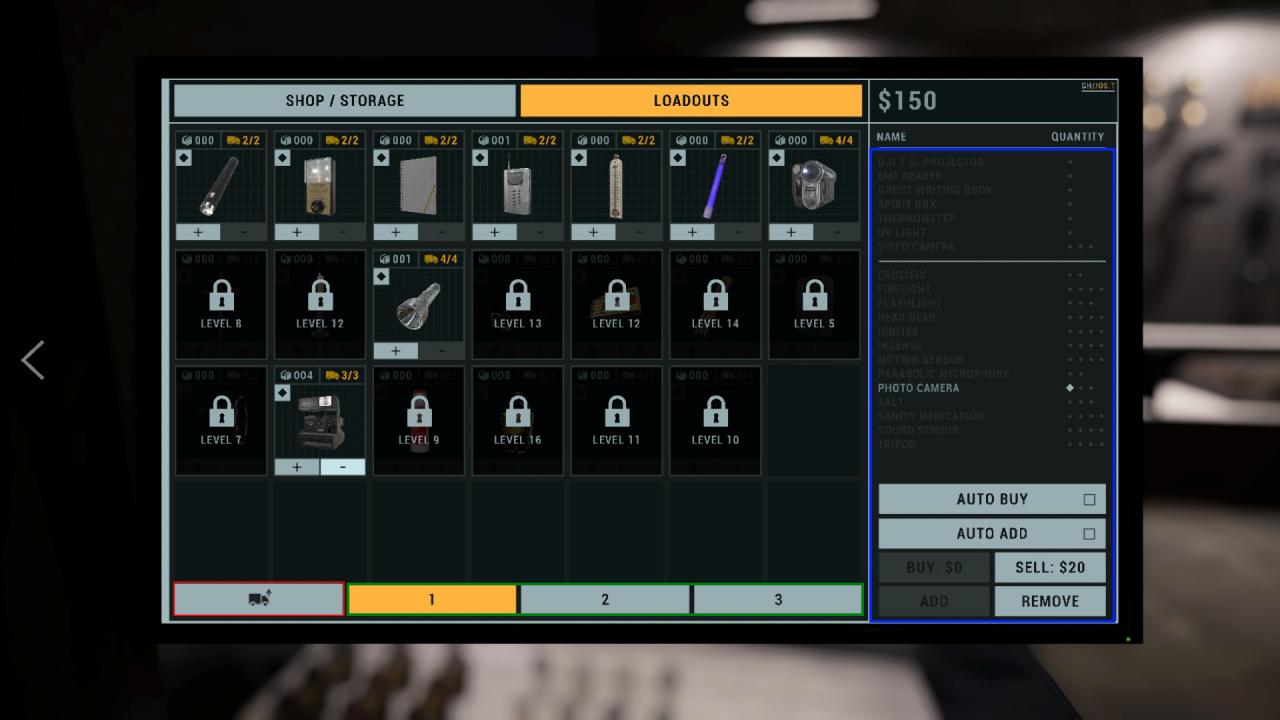
Red: the select all button. Clicking this and ‘add’ will move all available equipment into the truck.
Green: the loadout slots. Each loadout slot is able to store a different configuration.
Blue: the equipment list. Every time you add an item using the plus symbol, the equipment list will show a diamond. Each set of diamonds represents the amount of items that will be in the truck once the ‘add’ button is pressed. Likewise, pressing the ‘remove’ button will remove that same amount of items from the truck. Pressing add twice will not add more items, but only match the quantity of the layout.
Layouts save automatically when changes are made.
[TL;DR] Basic Usage Summaries (Bringing/Buying/Selling items, Loadouts)
- The plus and minus buttons only change the equipment list and don’t do any actions themselves.
- The equipment list is what you have selected and not your actual equipment. The actual equipment is shown above the item icons.
- Pressing the buttons (add/remove/buy/sell) will do those actions on the amount of items you have put in the equipment list.
- The layout DOES work with the plus and minus buttons. You put the amount of items you want, and then you press add to put it into the truck.
- Press ‘+’ on each item until the equipment list matches the number of each item you want to bring in (minus the amount already in the truck, as shown next to the truck symbol above the item icons).
- Press add.
- Observe the changes made by looking at the truck symbol on the top right of the items’ icons.
- Press the trashcan to reset the list.
- Look at the storage icon above each item to see how many you have of each.
- Press ‘+’ on each item until the equipment list on the right reflects how many items you want to buy (amount of items desired – the amount in storage).
- Press buy.
- Observe the changes by looking at the storage symbol on the top left of the items’ icons.
- Press the trashcan symbol to reset the list.
- Look at how many items you are bringing into the mission by looking at the top right of the items’ icons, next to the truck symbol.
- Press ‘+’ on each item until the equipment list reflects how many items you wish to remove from the truck.
- Press ‘remove’ to remove that amount of items from the truck.
- Observe the changes made by looking at the truck symbol on the top right of the items’ icons.
- Press the trashcan symbol to reset the list.
- Look at how many items you have in the storage by looking at the top left of the items’ icons, next to the box symbol.
- Press ‘+’ on each item until the equipment list reflects how many items you wish to sell.
- Press sell.
- Observe the changes by looking at the storage symbol on the top left of the items’ icons.
- Press the trashcan symbol to reset the list.
- Click on the loadout slot you wish to change
- Press +/- on each item until the diamonds on the equipment list reflect how many items you wish to bring into the mission.
- Press add.
By Lewis
More Guides:
- Phasmophobia: New Level and Prestige System
- Phasmophobia: How to Upgrade Your Equipment to Tier 2 & 3
- Phasmophobia: Golden Trophy Guide
- Phasmophobia: Hidden Ghosts Abilities (Real Journal v0.6.2.1))
- Phasmophobia: Notes to Take From the New Tutorial (V0.9 Update)