
I made this cheat sheet because rerolling at the Blacksmith in Minecraft Dungeons II is expensive, and guessing which effects can appear on a piece of gear wastes both time and gear. Every table below lists the random effects that can roll on a regular item, plus the fixed Tier I, Tier II, and Tier III values for each one.
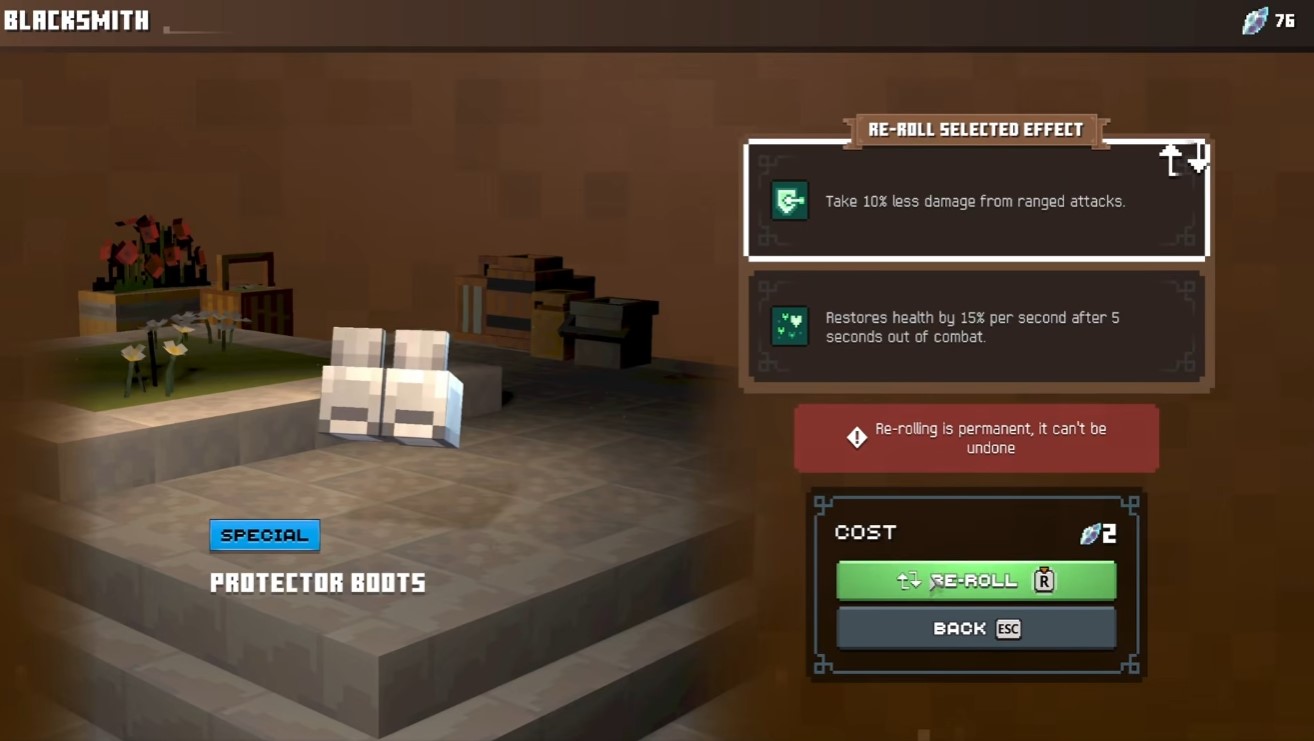
You can search this page for your item if you already know what you have, or scroll the tabs by category. The effect glossary at the bottom tells you what every roll actually does, so read that first if the names look unfamiliar.
Overview
This guide lists the random gear effects that can roll on each regular/base item, together with the exact Tier I, Tier II, and Tier III tooltip values. I wrote it so you can check a number before you commit to a reroll, instead of gambling and hoping.
If you are still hunting down gear between trips to the Blacksmith, some drops sit behind a secret boss, so that is worth knowing before you spend your resources on rerolling the wrong piece. I keep the tables plain and the notes short, because the values are what matter here.
Minecraft Dungeons II – Blacksmith Reroll Tables
Before you jump into the tables, a few rules are worth locking down first. They are simple, but they shape how you read every number below.
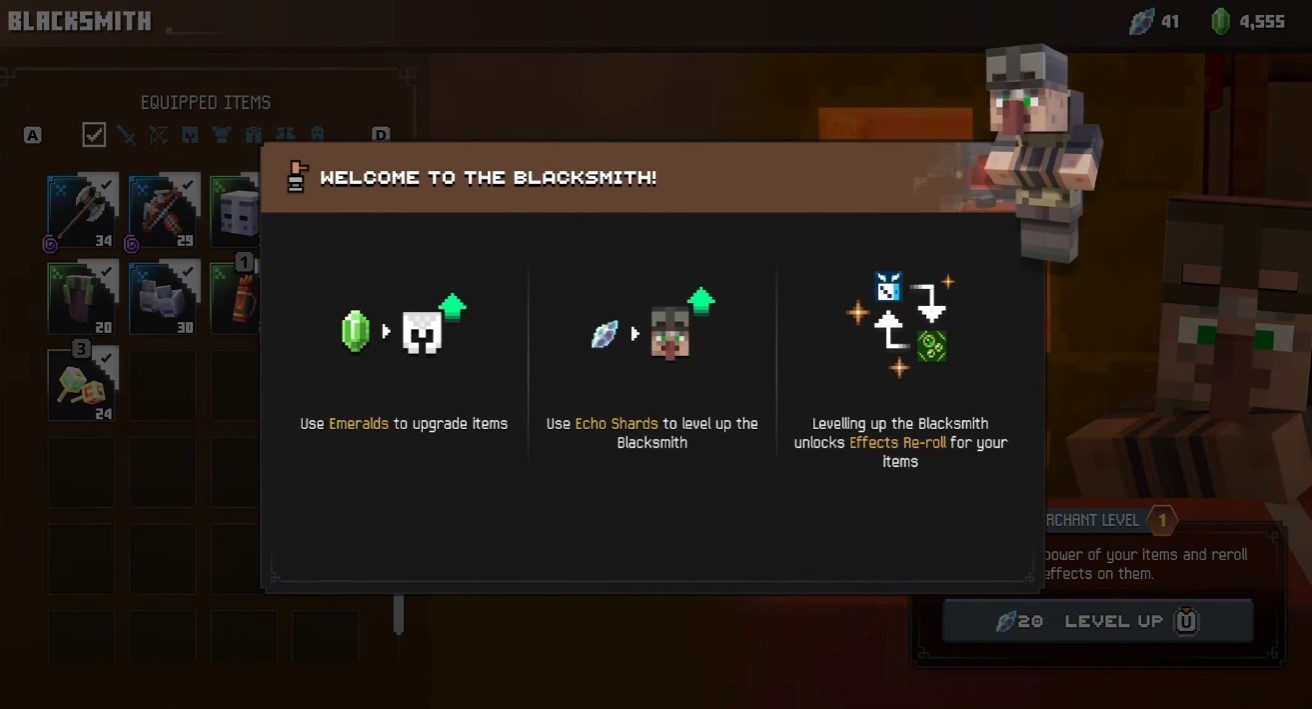
Tier values are fixed steps, not continuous ranges. When you see 10% / 15% / 20%, those are the only three strengths an effect can roll at — not a range where anything in between is possible. I treat each tier as its own separate outcome when I weigh a reroll.
Rarity decides how many random effects an item gets. A Common item has 0 random effects, a Rare item has 1, and a Special item has 2. On top of that, Unique items add a fixed Unique effect that is separate from their random effect slot or slots.
Cost climbs as you reroll. The first reroll costs 1, and every second reroll raises the price by +1. It caps at 20 per reroll, so repeated rerolls on the same piece get expensive fast.
To find your gear, press Ctrl + F and search for the item you need. If you would rather browse, go through the main tabs — the gear is sorted alphabetically, so it is easy to scan once you know the category. Then check the Glossary at the end for what each roll actually does.
Melee Weapons
Melee weapons are where most reroll money goes, so I put these first. Each table below lists the random effects that can land on that weapon, with the exact Tier I, Tier II, and Tier III numbers. Weapons are alphabetical, so scan down until you find yours.
Axe
| Effect | Tier I | Tier II | Tier III |
|---|---|---|---|
| Critical Edge | 10% | 20% | 30% |
| Critical Hit | 5% | 10% | 15% |
| Impact | 10% | 20% | 30% |
| Knockback | 15% | 20% | 30% |
| Looter | 20% | 40% | 60% |
| Pack Leader | 20% | 25% | 30% |
| Persistence | 10% | 15% | 20% |
| Quiver | 10% | 15% | 20% |
| Raider | 1% | 2% | 3% |
| Reaper | 25% | 35% | 45% |
| Sharpness | 10% | 20% | 30% |
| Sharpshooter | 30% | 35% | 40% |
Battle Hammer
| Effect | Tier I | Tier II | Tier III |
|---|---|---|---|
| Brawler | 20% | 30% | 40% |
| Bully | 25% | 35% | 50% |
| Critical Edge | 10% | 20% | 30% |
| Critical Hit | 5% | 10% | 15% |
| Impact | 10% | 20% | 30% |
| Knockback | 15% | 20% | 30% |
| Looter | 20% | 40% | 60% |
| Momentum | 20% | 30% | 40% |
| Persistence | 10% | 15% | 20% |
| Raider | 1% | 2% | 3% |
| Reaper | 25% | 35% | 45% |
| Shackler | 10% | 15% | 25% |
| Sharpness | 10% | 20% | 30% |
Battlestaff
| Effect | Tier I | Tier II | Tier III |
|---|---|---|---|
| Critical Edge | 10% | 20% | 30% |
| Critical Hit | 5% | 10% | 15% |
| Impact | 10% | 20% | 30% |
| Knockback | 15% | 20% | 30% |
| Looter | 20% | 40% | 60% |
| Persistence | 10% | 15% | 20% |
| Raider | 1% | 2% | 3% |
| Reaper | 25% | 35% | 45% |
| Sharpness | 10% | 20% | 30% |
Claymore
| Effect | Tier I | Tier II | Tier III |
|---|---|---|---|
| Bounty Hunter | 20% | 25% | 30% |
| Brawler | 20% | 30% | 40% |
| Critical Edge | 10% | 20% | 30% |
| Critical Hit | 5% | 10% | 15% |
| Duelist | 20% | 25% | 30% |
| Finesse | 15% | 25% | 35% |
| Impact | 10% | 20% | 30% |
| Knockback | 15% | 20% | 30% |
| Looter | 20% | 40% | 60% |
| Momentum | 20% | 30% | 40% |
| Persistence | 10% | 15% | 20% |
| Precision | 10% | 15% | 20% |
| Raider | 1% | 2% | 3% |
| Sharpness | 10% | 20% | 30% |
| Strength | 15% | 20% | 25% |
| Vanguard | 20% | 35% | 50% |
Clobberer
| Effect | Tier I | Tier II | Tier III |
|---|---|---|---|
| Brawler | 20% | 30% | 40% |
| Critical Edge | 10% | 20% | 30% |
| Critical Hit | 5% | 10% | 15% |
| Impact | 10% | 20% | 30% |
| Knockback | 15% | 20% | 30% |
| Looter | 20% | 40% | 60% |
| Momentum | 20% | 30% | 40% |
| Persistence | 10% | 15% | 20% |
| Raider | 1% | 2% | 3% |
| Sharpness | 10% | 20% | 30% |
Cookiecutter
| Effect | Tier I | Tier II | Tier III |
|---|---|---|---|
| Bounty Hunter | 20% | 25% | 30% |
| Critical Edge | 10% | 20% | 30% |
| Critical Hit | 5% | 10% | 15% |
| Duelist | 20% | 25% | 30% |
| Finesse | 15% | 25% | 35% |
| Impact | 10% | 20% | 30% |
| Knockback | 15% | 20% | 30% |
| Looter | 20% | 40% | 60% |
| Persistence | 10% | 15% | 20% |
| Precision | 10% | 15% | 20% |
| Raider | 1% | 2% | 3% |
| Sharpness | 10% | 20% | 30% |
| Strength | 15% | 20% | 25% |
| Vanguard | 20% | 35% | 50% |
Double Daggers
| Effect | Tier I | Tier II | Tier III |
|---|---|---|---|
| Bully | 25% | 35% | 50% |
| Critical Edge | 10% | 20% | 30% |
| Critical Hit | 5% | 10% | 15% |
| Impact | 10% | 20% | 30% |
| Knockback | 15% | 20% | 30% |
| Looter | 20% | 40% | 60% |
| Persistence | 10% | 15% | 20% |
| Quiver | 10% | 15% | 20% |
| Raider | 1% | 2% | 3% |
| Reaper | 25% | 35% | 45% |
| Shackler | 10% | 15% | 25% |
| Sharpness | 10% | 20% | 30% |
| Sharpshooter | 30% | 35% | 40% |
Double Sickles
| Effect | Tier I | Tier II | Tier III |
|---|---|---|---|
| Bounty Hunter | 20% | 25% | 30% |
| Critical Edge | 10% | 20% | 30% |
| Critical Hit | 5% | 10% | 15% |
| Finesse | 15% | 25% | 35% |
| Impact | 10% | 20% | 30% |
| Knockback | 15% | 20% | 30% |
| Looter | 20% | 40% | 60% |
| Pack Leader | 20% | 25% | 30% |
| Persistence | 10% | 15% | 20% |
| Raider | 1% | 2% | 3% |
| Reaper | 25% | 35% | 45% |
| Sharpness | 10% | 20% | 30% |
| Strength | 15% | 20% | 25% |
Gauntlets
| Effect | Tier I | Tier II | Tier III |
|---|---|---|---|
| Bounty Hunter | 20% | 25% | 30% |
| Critical Edge | 10% | 20% | 30% |
| Critical Hit | 5% | 10% | 15% |
| Duelist | 20% | 25% | 30% |
| Finesse | 15% | 25% | 35% |
| Impact | 10% | 20% | 30% |
| Knockback | 15% | 20% | 30% |
| Looter | 20% | 40% | 60% |
| Persistence | 10% | 15% | 20% |
| Precision | 10% | 15% | 20% |
| Raider | 1% |
One note on the Gauntlets table: my source data cuts off partway through the Raider row, so only the Tier I value is listed there. I left the rest blank instead of guessing the missing numbers.
Ranged Weapons
If you run an archer build, this is the section you will live in. Nearly every bow and crossbow shares the same core effects — Critical Edge, Critical Hit, Impact, Knockback, Looter, Persistence, and Raider — so the real question is which extras each weapon can roll on top of that base. That is what I check before I reroll anything.
Bow
| Effect | Tier I | Tier II | Tier III |
|---|---|---|---|
| Critical Edge | 10% | 20% | 30% |
| Critical Hit | 5% | 10% | 15% |
| Impact | 10% | 20% | 30% |
| Knockback | 15% | 20% | 30% |
| Looter | 20% | 40% | 60% |
| Persistence | 10% | 15% | 20% |
| Raider | 1% | 2% | 3% |
Crossbow
| Effect | Tier I | Tier II | Tier III |
|---|---|---|---|
| Bounty Hunter | 20% | 25% | 30% |
| Critical Edge | 10% | 20% | 30% |
| Critical Hit | 5% | 10% | 15% |
| Impact | 10% | 20% | 30% |
| Knockback | 15% | 20% | 30% |
| Looter | 20% | 40% | 60% |
| Persistence | 10% | 15% | 20% |
| Raider | 1% | 2% | 3% |
| Vanguard | 20% | 35% | 50% |
Dual Crossbows
| Effect | Tier I | Tier II | Tier III |
|---|---|---|---|
| Bounty Hunter | 20% | 25% | 30% |
| Critical Edge | 10% | 20% | 30% |
| Critical Hit | 5% | 10% | 15% |
| Impact | 10% | 20% | 30% |
| Knockback | 15% | 20% | 30% |
| Looter | 20% | 40% | 60% |
| Marksman | 15% | 20% | 25% |
| Persistence | 10% | 15% | 20% |
| Raider | 1% | 2% | 3% |
| Reaper | 25% | 35% | 45% |
Greatbow
| Effect | Tier I | Tier II | Tier III |
|---|---|---|---|
| Aim | 10% | 15% | 20% |
| Bounty Hunter | 20% | 25% | 30% |
| Critical Edge | 10% | 20% | 30% |
| Critical Hit | 5% | 10% | 15% |
| Impact | 10% | 20% | 30% |
| Knockback | 15% | 20% | 30% |
| Looter | 20% | 40% | 60% |
| Marksman | 15% | 20% | 25% |
| Persistence | 10% | 15% | 20% |
| Quiver | 10% | 15% | 20% |
| Raider | 1% | 2% | 3% |
| Ranger | 20% | 30% | 40% |
| Sharpshooter | 30% | 35% | 40% |
| Sniper | 25% | 50% | 75% |
| Vanguard | 20% | 35% | 50% |
Heavy Crossbow
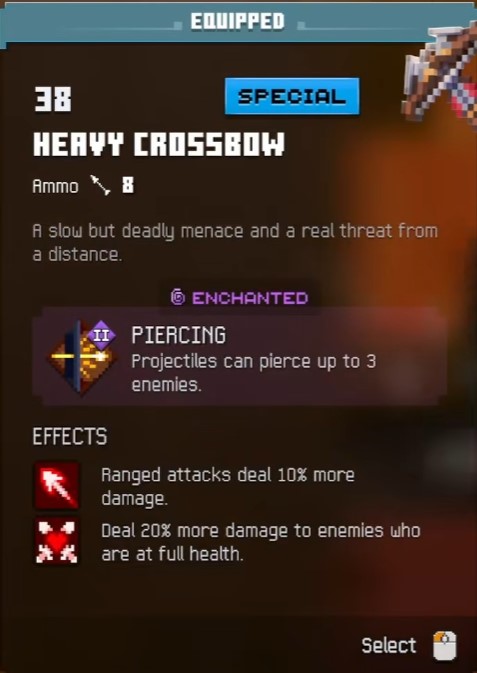
| Effect | Tier I | Tier II | Tier III |
|---|---|---|---|
| Bounty Hunter | 20% | 25% | 30% |
| Critical Edge | 10% | 20% | 30% |
| Critical Hit | 5% | 10% | 15% |
| Impact | 10% | 20% | 30% |
| Knockback | 15% | 20% | 30% |
| Looter | 20% | 40% | 60% |
| Momentum | 20% | 30% | 40% |
| Persistence | 10% | 15% | 20% |
| Point Blank | 25% | 50% | 75% |
| Raider | 1% | 2% | 3% |
| Vanguard | 20% | 35% | 50% |
Longbow
| Effect | Tier I | Tier II | Tier III |
|---|---|---|---|
| Aim | 10% | 15% | 20% |
| Critical Edge | 10% | 20% | 30% |
| Critical Hit | 5% | 10% | 15% |
| Impact | 10% | 20% | 30% |
| Knockback | 15% | 20% | 30% |
| Looter | 20% | 40% | 60% |
| Marksman | 15% | 20% | 25% |
| Persistence | 10% | 15% | 20% |
| Quiver | 10% | 15% | 20% |
| Raider | 1% | 2% | 3% |
| Ranger | 20% | 30% | 40% |
| Sharpshooter | 30% | 35% | 40% |
| Sniper | 25% | 50% | 75% |
Powerbow
| Effect | Tier I | Tier II | Tier III |
|---|---|---|---|
| Aim | 10% | 15% | 20% |
| Bounty Hunter | 20% | 25% | 30% |
| Critical Edge | 10% | 20% | 30% |
| Critical Hit | 5% | 10% | 15% |
| Impact | 10% | 20% | 30% |
| Knockback | 15% | 20% | 30% |
| Looter | 20% | 40% | 60% |
| Marksman | 15% | 20% | 25% |
| Persistence | 10% | 15% | 20% |
| Quiver | 10% | 15% | 20% |
| Raider | 1% | 2% | 3% |
| Ranger | 20% | 30% | 40% |
| Sharpshooter | 30% | 35% | 40% |
| Sniper | 25% | 50% | 75% |
| Vanguard | 20% | 35% | 50% |
Rapid Crossbow
| Effect | Tier I | Tier II | Tier III |
|---|---|---|---|
| Aim | 10% | 15% | 20% |
| Bounty Hunter | 20% | 25% | 30% |
| Critical Edge | 10% | 20% | 30% |
| Critical Hit | 5% | 10% | 15% |
| Impact | 10% | 20% | 30% |
| Knockback | 15% | 20% | 30% |
| Looter | 20% | 40% | 60% |
| Marksman | 15% | 20% | 25% |
| Persistence | 10% | 15% | 20% |
| Quiver | 10% | 15% | 20% |
| Raider | 1% | 2% | 3% |
| Ranger | 20% | 30% | 40% |
| Sharpshooter | 30% | 35% | 40% |
| Sniper | 25% | 50% | 75% |
Scatter Crossbow
| Effect | Tier I | Tier II | Tier III |
|---|---|---|---|
| Bully | 25% | 35% | 50% |
| Critical Edge | 10% | 20% | 30% |
| Critical Hit | 5% | 10% | 15% |
| Impact | 10% | 20% | 30% |
| Knockback | 15% | 20% | 30% |
| Looter | 20% | 40% | 60% |
| Pack Leader | 20% | 25% | 30% |
| Persistence | 10% | 15% | 20% |
| Raider | 1% | 2% | 3% |
| Reaper | 25% | 35% | 45% |
| Shackler | 10% | 15% | 25% |
Shortbow
| Effect | Tier I | Tier II | Tier III |
|---|---|---|---|
| Aim | 10% | 15% | 20% |
| Bounty Hunter | 20% | 25% | 30% |
| Critical Edge | 10% | 20% | 30% |
| Critical Hit | 5% | 10% | 15% |
One thing worth flagging on the Shortbow: my source data stops in the middle of the Critical Hit row, so those four entries are all I can confirm. I left it that way rather than guess at rows I cannot verify — if you reroll a Shortbow and see an effect that is not listed here, that is the gap talking, not a mistake on your end.
Armor
Armor works a little differently from weapons on this page. Instead of one list per piece, I broke the gear out by set, because pieces that belong to the same regular set use the same archetype combination — and that means they share one random-effect table. So if you have one piece of a set, you already know what the other three can roll.
Below you will find four armor set sections: Beekeeper Set, Bounty Hunter Set, Disciple Set, and Mushroom Set. Each one lists the effects that can appear on that set’s pieces, with the fixed Tier I, Tier II, and Tier III values.
Beekeeper Set
All four pieces of the Beekeeper Set roll from the exact same effect pool, so I only need one table here instead of four copies of the same thing. That means whether you are holding the Beekeeper Veil, Beekeeper Suit, Beekeeper Leggings, or Beekeeper Boots, the list below is what you can get.
| Effect | Tier I | Tier II | Tier III |
|---|---|---|---|
| Luck | 10% | 15% | 20% |
| Potion Maker | 5% | 10% | 20% |
| Prospector | 5% | 10% | 15% |
| Tainted | 40% | 60% | 80% |
The four pieces sharing this table are the Beekeeper Veil, Beekeeper Suit, Beekeeper Leggings, and Beekeeper Boots. Since they are one pool, a reroll on any of them costs the same and shows the same possible rolls. If you like the Tainted numbers, this is one set where rolling a second or third piece is not a big gamble.
Bounty Hunter Set
Like the Beekeeper pieces, the four parts of the Bounty Hunter Set all share one random-effect pool, so the table below covers every slot. I only wrote the effect rows once here instead of repeating the same numbers four times, because the values are identical on each piece.
The pieces that share this table are the Bounty Hunter Helmet, Bounty Hunter Chestplate, Bounty Hunter Shinguards, and Bounty Hunter Boots. That means a reroll on the helmet can show the same rolls as a reroll on the boots, so pick the slot you actually want to improve rather than rolling several at once.
| Effect | Tier I | Tier II | Tier III |
|---|---|---|---|
| Luck | 10% | 15% | 20% |
| Potion Maker | 5% | 10% | 20% |
| Prickly | 50% | 65% | 80% |
| Projectile Protection | 10% | 15% | 20% |
| Prospector | 5% | 10% | 15% |
| Protection | 10% | 15% | 20% |
| Recovery | 10% | 20% | 30% |
| Regeneration | 5% | 7.5% | 10% |
| Resilience | 20% | 25% | 30% |
There are nine effects to roll through here. Prickly jumps out at me the most, since it starts at 50% even on Tier I. Regeneration has the smallest step between tiers, so a Tier III hit there is only a modest gain. If you are only rerolling for one specific effect, I suggest setting your expectations by checking that effect first, and only then deciding how many times to roll.
Disciple Set
The Disciple Set is the last of the full shared-table sets before we get to the Mushroom Set. All four pieces roll from the same pool, so once you learn these rows you already know the whole set. I checked each piece against the source and the effect list is identical across all of them.
Here is what you get from Disciple Mask, Disciple Robe, Disciple Leggings, and Disciple Wraps. Notice that Prowler and Stealth both scale higher than the rest — if you are building around either one, a Tier III roll is worth the rerolls.
| Effect | Tier I | Tier II | Tier III |
|---|---|---|---|
| Acrobat | 10% | 15% | 25% |
| Assassin | 10% | 15% | 20% |
| Deflection | 10% | 15% | 20% |
| Evasion | 10% | 15% | 20% |
| Luck | 10% | 15% | 20% |
| Projectile Protection | 10% | 15% | 20% |
| Prospector | 5% | 10% | 15% |
| Protection | 10% | 15% | 20% |
| Prowler | 15% | 20% | 30% |
| Stealth | 20% | 25% | 35% |
| Swiftness | 10% | 15% | 20% |
One detail that caught my eye: Acrobat jumps from 15% to 25% between Tier II and Tier III, which is a bigger step than most effects on this table. Prospector starts low at 5%, so it is the weakest roll here until you push it up. If you are only after one effect, check its tier values first and decide how far you are willing to reroll.
Mushroom Set
The original guide lists a Mushroom Set here, with Mushroom Cap as the first piece. In the source, that entry opens with Elemental Protection and then cuts off mid-word. I am not going to fill in the blanks for you, because I do not have the full table. If the set was expanded later, this is the spot where I would pull the missing tier values from the live game before trusting a reroll.
Short version: treat this section as incomplete. The only confirmed detail is that Mushroom Cap rolls Elemental Protection, and the source implies there is more on the table than one row. I would rather leave it short and honest than guess at numbers.
Artifacts
Artifacts pull from the common artifact-effect pool. On top of that shared pool, Support artifacts add Ally, Healer, and Totem Radius, while Summoner artifacts add Ally, Healer, Shepherd, and Veterinarian. As for how many effects you actually get, a Rare artifact rolls 1 random effect and a Special artifact rolls 2.
One thing I noticed while building these tables: most of the bangles, scepters, and quivers share the exact same row set. Rather than repeat the same grid over and over, I grouped the identical ones into a single shared table and listed which artifacts use it.
Battle Banner gets its own table because it adds the Support and Summoner extras:
| Effect | Tier I | Tier II | Tier III |
|---|---|---|---|
| Ally | 15% | 30% | 50% |
| Cooldown | 10% | 15% | 20% |
| Cryomancer | 10% | 15% | 20% |
| Electromancer | 10% | 15% | 20% |
| Healer | 25% | 35% | 50% |
| Pyromancer | 10% | 15% | 20% |
| Shepherd | 5% | 10% | 15% |
| Sorcerer | 10% | 15% | 20% |
| Soulmancer | 10% | 15% | 20% |
| Spiritual | 25% | 30% | 35% |
| Totem Radius | 20% | 30% | 40% |
| Venomancer | 10% | 15% | 20% |
| Veterinarian | 5% | 10% | 15% |
The artifacts below all share the same base artifact-effect rows, so I put them in one table. This covers Blaze Bangle, Blight Bangle, Blizzard Bangle, Cinder Scepter, Conductive Quiver, Corrupted Beacon, Corrupted Seeds, Creeper Candle, Death Cap Mushroom, and Echo Ocarina.
| Effect | Tier I | Tier II | Tier III |
|---|---|---|---|
| Cooldown | 10% | 15% | 20% |
| Cryomancer | 10% | 15% | 20% |
| Electromancer | 10% | 15% | 20% |
| Pyromancer | 10% | 15% | 20% |
| Sorcerer | 10% | 15% | 20% |
| Soulmancer | 10% | 15% | 20% |
| Spiritual | 25% | 30% | 35% |
| Venomancer | 10% | 15% | 20% |
Electric Bangle also uses this same row set, but the source cuts off partway through the Soulmancer row. I am only listing the values that were actually there, so treat the Electric Bangle numbers below as incomplete.
| Effect | Tier I | Tier II | Tier III |
|---|---|---|---|
| Cooldown | 10% | 15% | 20% |
| Cryomancer | 10% | 15% | 20% |
| Electromancer | 10% | 15% | 20% |
| Pyromancer | 10% | 15% | 20% |
| Sorcerer | 10% | 15% | 20% |
| Soulmancer | 1 | — | — |
Effect Glossary
This last table is the key to the whole cheat sheet. Each effect is listed with its category, the fixed Tier I, II, and III values, and a plain explanation of what the roll does. If a name on the tables above looked unfamiliar, find it here first before you reroll.
| Effect | Category | Tier I | Tier II | Tier III | What it does |
|---|---|---|---|---|---|
| Acrobat | Utility | 10% | 15% | 25% | Reduces rolling cooldown time. |
| Aim | Attack | 10% | 15% | 20% | Increases critical-hit chance with ranged attacks. |
| Ally | Utility | 15% | 30% | 50% | Positive statuses you apply to yourself and allies last longer. |
| Assassin | Utility | 10% | 15% | 20% | Chance to remain Shadowcloaked when attacking. |
| Bounty Hunter | Attack | 20% | 25% | 30% | Deals more damage to wounded enemies. |
| Bowyer | Utility | 20% | 25% | 30% | Chance to gain an additional arrow whenever ammo is regained. |
| Brawler | Attack | 20% | 30% | 40% | Melee attacks deal more damage to secondary targets. |
| Bully | Attack | 25% | 35% | 50% | Deals more damage to enemies affected by a negative status. |
| Cooldown | Utility | 10% | 15% | 20% | Reduces artifact cooldown time. |
| Critical Edge | Attack | 10% | 20% | 30% | Critical hits deal more damage. |
| Critical Hit | Attack | 5% | 10% | 15% | Increases the chance of critical hits. |
| Cryomancer | Attack | 10% | 15% | 20% | Frost attacks deal more damage. |
| Deflection | Defense | 10% | 15% | 20% | Chance to deflect enemy projectiles. |
| Duelist | Attack | 20% | 25% | 30% | Melee attacks deal more damage to primary targets. |
| Electromancer | Attack | 10% | 15% | 20% | Lightning attacks deal more damage. |
| Elemental Protection | Defense | 10% | 15% | 20% | Reduces damage taken from elemental attacks. |
| Evasion | Utility | 10% | 15% | 20% | Chance to evade melee damage. |
| Finesse | Attack | 15% | 25% | 35% | Increases attack damage while jumping or rolling. |
| Fletcher | Utility | 15% | 20% | 25% | Reduces ranged-ammo cooldown time. |
| Healer | Defense | 25% | 35% | 50% | Increases healing given to yourself and allies. |
| Impact | Attack | 10% | 20% | 30% | Ranged attacks deal more damage. |
| Knockback | Attack | 15% | 20% | 30% | Attacks cause more knockback. |
| Looter | Utility | 20% | 40% | 60% | Chance to receive additional loot drops. |
| Luck | Utility | 10% | 15% | 20% | Chance for dropped items to have duplicate variations. |
| Marksman | Attack | 15% | 20% | 25% | Critical hits with ranged weapons deal more damage. |
| Momentum | Attack | 20% | 30% | 40% | Increases the chance to stagger enemies on hit. |
| Pack Leader | Attack | 20% | 25% | 30% | Companions deal more damage. |
| Persistence | Attack | 10% | 15% | 20% | Increases damage based on your total missing health. |
| Point Blank | Attack | 25% | 50% | 75% | Ranged attacks deal more damage at close range. |
| Potion Maker | Utility | 5% | 10% | 20% | Reduces potion cooldown time. |
| Precision | Attack | 10% | 15% | 20% | Increases critical-hit chance with melee attacks. |
| Prickly | Attack | 50% | 65% | 80% | Reflects part of received damage back to the attacker. |
| Projectile Protection | Defense | 10% | 15% | 20% | Reduces damage taken from ranged attacks. |
| Prospector | Utility | 5% | 10% | 15% | Chance to receive additional emeralds. |
| Protection | Defense | 10% | 15% | 20% | Reduces all damage taken. |
| Prowler | Utility | 15% | 20% | 30% | Increases movement speed while Shadowcloaked. |
| Pyromancer | Attack | 10% | 15% | 20% | Fire attacks deal more damage. |
| Quiver | Utility | 10% | 15% | 20% | Increases maximum carried ammo. |
| Raider | Utility | 1% | 2% | 3% | Chance for loot drops to be a higher rarity. |
| Ranger | Attack | 20% | 30% | 40% | Chance to fire additional projectiles. |
| Reaper | Utility | 25% | 35% | 45% | Increases souls gained. |
| Recovery | Defense | 10% | 20% | 30% | Increases all healing received. |
| Regeneration | Defense | 5% | 7.5% | 10% | Restores health per second after 5 seconds out of combat. |
| Resilience | Defense | 20% | 25% | 30% | Recover from negative statuses faster. |
| Shackler | Attack | 10% | 15% | 25% | Chance for attacks to inflict the Chained status. |
| Sharpness | Attack | 10% | 20% | 30% | Melee attacks deal more damage. |
| Sharpshooter | Attack | 30% | 35% | 40% | Charged ranged attacks deal more damage. |
| Shepherd | Defense | 5% | 10% | 15% | Companions take less damage. |
| Sniper | Attack | 25% | 50% | 75% | Ranged attacks deal more damage from far away. |
| Sorcerer | Attack | 10% | 15% | 20% | Artifact attacks deal more damage. |
| Soulmancer | Attack | 10% | 15% | 20% | Soul attacks deal more damage. |
| Speed | Utility | 5% | 10% | 15% | Increases movement speed. |
| Spiritual | Utility | 25% | 30% | 35% | Increases Soul capacity. |
| Stealth | Utility | 20% | 25% | 35% | Shadowcloaking lasts longer. |
| Strength | Attack | 15% | 20% | 25% | Critical hits with melee weapons deal more damage. |
| Swiftness | Attack | 10% | 15% | 20% | Increases melee attack speed. |
| Tainted | Utility | 40% | 60% | 80% | Negative statuses on enemies last longer. |
| Totem Radius | Utility | 20% | 30% | 40% | Increases the area of positive status effects. |
| Vanguard | Attack | 20% | 35% | 50% | Deals more damage to enemies at full health. |
| Venomancer | Attack | 10% | 15% | 20% | Poison attacks deal more damage. |
Two entries look similar but are different rolls: Speed raises movement speed, while Swiftness raises melee attack speed. I keep both here exactly as the game lists them, because it is easy to mix them up when you are scanning a table quickly.
Conclusion
That is the full reference. Check the effect you want, confirm its tier values, then head to the Blacksmith with a plan instead of a guess. Good luck with your rolls.


