
Four slab fragments, two boss phases, and one egg that only goes to whoever pulls the trigger on the raid. That’s the entire Bellanoir Libero loop in Palworld 1.0, but the path there involves tower bosses, expedition RNG, and a fight that changes its own type halfway through. This guide walks you through every step to obtain Bellanoir Libero, from unlocking the Pal Expedition Station to defeating its two-phase raid and hatching the Huge Dark Egg.
What You’re Working Toward
Bellanoir Libero isn’t caught in the wild. It’s a raid boss summoned with a crafted slab, and you only get access to that slab after grinding four fragments together. Expect this process to span multiple sessions: you’re gating fragment access behind tower boss kills, then gating the summon itself behind a level 33 tech unlock.
This section of the guide covers where fragments drop, how the summoning process actually works, and what to bring into the fight so you’re not wasting a raid attempt on the wrong Pal types.
Step-by-Step: From Expedition Station to Summoning Altar
1. Unlock the Pal Expedition Station. This sits in the technology tree at level 22. No way around the level requirement.
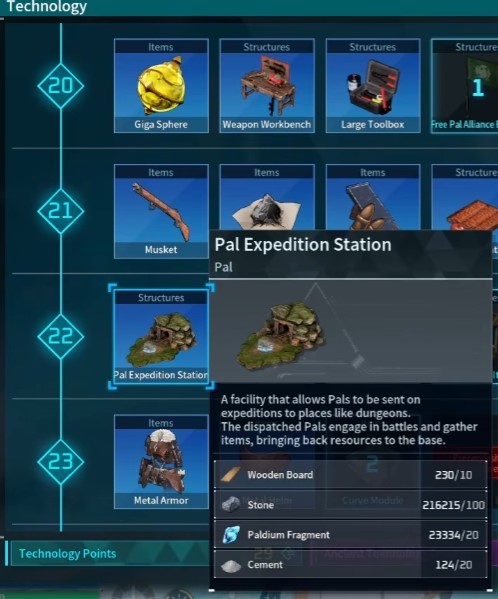
2. Send expeditions to Blazing Cavern and Astral Frost Cavern. These two locations passively generate Bellanoir Libero slab fragments over time. The catch: both expeditions stay locked until you’ve defeated their respective tower bosses. If you haven’t cleared those towers yet, this route is dead on arrival.
3. Or run dungeons directly. Desert, volcano, and snow region dungeons all have a chance to drop fragments. Snow region dungeons are the better bet — their end chest occasionally drops a complete slab instead of a single fragment, which skips the combining step entirely. Check your map for marked dungeons in snow biomes before you commit to a farming route.
4. Collect 4 slab fragments. Whether from expeditions, dungeon chests, or a mix of both, you need four total.
5. Combine them at any workbench. This crafts the actual Bellanoir Libero slab. No special station required here — any standard workbench does the job.
6. Build a Summoning Altar. This unlocks in the ancient tech tree at level 33. It’s a separate structure from your usual crafting benches, so budget the materials for it ahead of time.
7. Offer the slab at the altar. Approach the Summoning Altar, interact, and select the Bellanoir Libero slab from your offering menu. You’ll get a choice between starting the raid at your base or in a designated raid area — pick based on whether you want your base defenses nearby or a clean arena.
8. Interact with the summoning point. This triggers the fight start.
9. Fight through both phases. Bellanoir Libero opens as a Dark type. Once you bring it to 1 HP, it revives as an Ice type for round two. Your team composition needs to account for both.
10. Claim the Huge Dark Egg. Only the player who initiated the raid with the slab receives this egg — it goes straight into their inventory on victory.
11. Incubate the egg. Standard incubation process, same as any other large egg. This is what actually hatches Bellanoir Libero as a Pal you can use.

Combat Tips and Common Snags
The type switch is the single biggest thing people get wrong on their first attempt. Here’s what actually works:
| Phase | Type | Countered By |
|---|---|---|
| Phase 1 | Dark | Dragon type Pals |
| Phase 2 (post-revive) | Ice | Fire type Pals |
Bring both Dragon and Fire Pals into the raid, or plan a mid-fight swap. Showing up with a single-type team means you’re strong for half the fight and struggling for the other half.
A few practical notes that save time:
- Snow region dungeons remain the most efficient fragment source because of the full-slab chest drop chance. Prioritize these over desert or volcano runs if you have a choice.
- Double-check tower boss progress before planning around Blazing Cavern or Astral Frost Cavern expeditions. If those towers aren’t cleared, the expeditions simply won’t be available options at the station.
- The Huge Dark Egg has a single recipient. If you’re playing co-op and want the egg yourself, make sure you’re the one interacting with the altar and starting the raid, not a teammate.
About Bellanoir Libero Itself
Visually, Bellanoir Libero reads as a tall, witch-like humanoid wrapped in a black gown-like body. Blue eye-like patterns ring its waist, and where legs should be, pinkish-purple flames flicker beneath the skirt hem instead. The arms end in frayed sleeves with three white triangular points standing in for hands.
The face carries the most personality: a long-lashed left eye with a blue pupil, while pink hair falls over and conceals the right eye entirely. An antler-like protrusion juts from the left side of the forehead, pink at the base and fading to light purple toward the tip.
Availability is strictly raid-and-hatch: you summon it at the Summoning Altar using the slab, defeat it, and receive the Huge Dark Egg that hatches into your own Bellanoir Libero.
Stat growth at level 80 (calculated without Passive Skills, Pal Condensing, or Trust bonuses):
| Stat | Growth | Min (Lv80) | Max (Lv80) |
|---|---|---|---|
| HP | 120 | 4725 | 5895 |
| Attack | 150 | 831 | 1050 |
| Defense | 100 | 537 | 683 |
Those HP numbers explain why the raid takes real preparation — this isn’t a boss you stumble through with a mismatched team. Bring the right types for each phase, and the fight moves fast. Bring the wrong ones, and you’ll be here a while.
Keep following KosGames for more tips and updates. If you want to learn more about Rare Pal Location Guide, Silvance Pal Location Guide, and Aegidron Location Guide, check out these related guides next.


